Tuesday, June 06, 2006
Hobbies Part 2: The Diary of a Mad Montage Maker
First off I apologize. I never thought this would be such a long ass post.
While editing a training video today I realized that I would have never known how to do this 3 years ago. Strange how an interest in a Pop Idol can effect other areas of your life. You see, a side product of the being a Clay Aiken fan was, I had the sudden urge to be creative. The community that has grown through this experiment in fandom has provided some very creative outlets. There are the writers, both serious and humorous, photographers, creative web designers, graphic designers, video gatherers and editors.
Let's just say I was extremely limited in computer creativity before Clay.
The urge to create something started quite casually. I opened up PhotoShop and started to mess around a little. A little became a few hours. Using a simple filter I made some photos look like watercolors. WooHoo! I learned something. Ok, maybe I can learn something else. As simple as that, it had begun.
Now I had some pretty photos but what to do with them? Lurking around the net I found a free photo montage program. Adding each pic and then some music I created something. WooHoo! Learned something new! At the same time a lot of other people had discovered how fun it was to make montages and some were using video taken by the fans at concerts. Decided I had to have a go at it.
I quickly realized it wasn't going to be as easy as I thought. I was confused and to make matters worse, all I had was WindowsMovie Maker. Ugh. The King of the Crash. Sneeze and kiss your work goodbye. At one point it just stopped working. Even after an uninstall and then reinstall.
The first video montage I ever made sucked......hard. Whew.....it was a stinker. The stinkiest of stank. Play if you dare. Hee.
Other songs I have used:
Just Seen a Face – Holy Cole
Slow Like Honey – Fiona Apple
One Good Man – Janis Joplin
I'm on Fire – Bruce Springsteen
Beautiful Like Me – JoyDrop
Running Up That Hill – Placebo
Dare You To Move – Switchfoot
Dream On – Areosmith
I am the Man – Philosopher Kings
On a Day Like Today – Bryan Adams
Ordinary Day – Vanessa Carlton
Relax – Frankie Goes to Hollywood
Sweetest Perfection – Depeche Mode
First get VirtualDub
Open the file you wish to clip
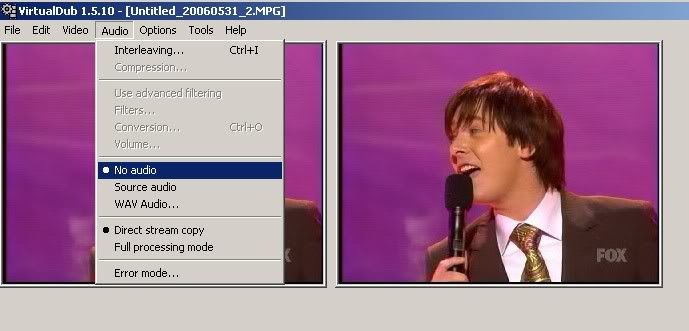 Since you are probably not going to use the audio from the clips, it is easier to remove it now, instead of when you are putting the video together. Go to the menu bar and select Audio. Click No Audio. This setting will hold for every file you import, until you close the program down.
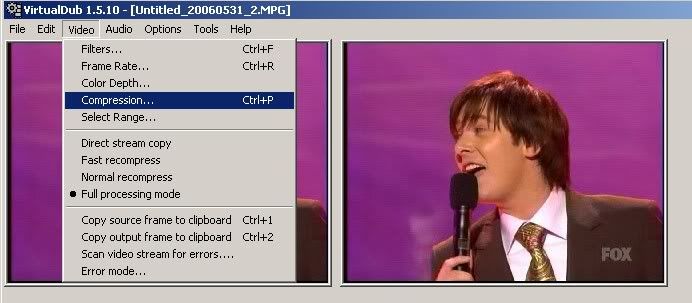
Next choose your compression. Files produced with the native settings of VirtualDub can be huge, even for a 2 second clip. Go to the menu bar and select Video and click compression. A pop up will appear. Select the compression you want. Some may not be available if you do not have the codecs. Experiment to see which suits you best.
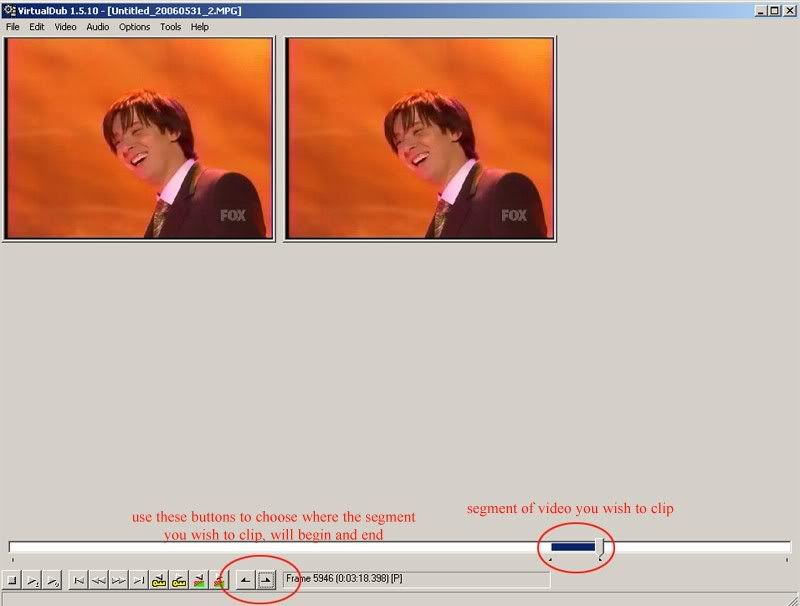
Time to take a clip from the raw footage. Using to MARKER tool, select the beginning and the end of the clip you want.

Go to the menu bar and select FILE, save as segmented .avi
OPTIONS: You can change the size of your video and other basic filters available here.
 You have completed the clipping portion, now let's get down to business.
Open your editing program.
 One of the greatest advantages of getting another editor beside MovieMaker is the ability to layer. With layering you can create some really interesting effects. I really like to create a gaussian effect to the clips I use. This really helps if the clip isn't of the best quality because you can somewhat blend the image to make it a little smoother. Lessons the pixelation. Even if the clip is of really good quality, using this effect can add nice glow to your subject. For example. Take a clip and duplicate it. Stack them on each other on the storyboard.
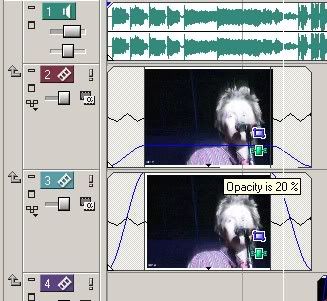 Change the Opacity level of the top clip by dragging the line on the top of the clip. Then apply effects to the bottom clip. This will allow you to maintain the image in a recognizable form, but have a few fx appear through the clip.
While editing a training video today I realized that I would have never known how to do this 3 years ago. Strange how an interest in a Pop Idol can effect other areas of your life. You see, a side product of the being a Clay Aiken fan was, I had the sudden urge to be creative. The community that has grown through this experiment in fandom has provided some very creative outlets. There are the writers, both serious and humorous, photographers, creative web designers, graphic designers, video gatherers and editors.
Let's just say I was extremely limited in computer creativity before Clay.
The urge to create something started quite casually. I opened up PhotoShop and started to mess around a little. A little became a few hours. Using a simple filter I made some photos look like watercolors. WooHoo! I learned something. Ok, maybe I can learn something else. As simple as that, it had begun.
Now I had some pretty photos but what to do with them? Lurking around the net I found a free photo montage program. Adding each pic and then some music I created something. WooHoo! Learned something new! At the same time a lot of other people had discovered how fun it was to make montages and some were using video taken by the fans at concerts. Decided I had to have a go at it.
I quickly realized it wasn't going to be as easy as I thought. I was confused and to make matters worse, all I had was WindowsMovie Maker. Ugh. The King of the Crash. Sneeze and kiss your work goodbye. At one point it just stopped working. Even after an uninstall and then reinstall.
The first video montage I ever made sucked......hard. Whew.....it was a stinker. The stinkiest of stank. Play if you dare. Hee.
What was I thinking with the star wars like intro?

But I learned something.
1.Never trust anything microsoft (you maybe forced to used to use it, but never trust it)
2.Caffeine is your friend
3.Organize yourself
Since WindowsMovie Baker was not about to step up to the challenge, I decided to try something else. I ended up settling on Vegas. It was fairly easy to learn. I also started learning how to convert formats and resize using a program called VirtualDub. This program is an absolute necessity to edit clips from lengthy video. And best of all.....IT'S FREE!
Editing raw footage is the first step. I discovered that I apparently have way to much time on my hands. Since 2003 I have built a little database with clips. The clips have fields attached to them so I can find them easily. It took being a Clay Aiken fan to get me organized. Now I'm a databasing fool. Just another side product. It really does help though if you are looking for a specific image for a certain part of a sequence or song. Speaking of which......
A word of advice when picking a song....always use something that speaks to you. Using a song suggested by someone else can be a tough chore and usually not a very satisfying outing. The only song that I have ever used that was suggested to me was Stroke. Not going there right now, but the montage made itself, I swear. I had nothing to do with it. Hee.
Other songs I have used:
Just Seen a Face – Holy Cole
Slow Like Honey – Fiona Apple
One Good Man – Janis Joplin
I'm on Fire – Bruce Springsteen
Beautiful Like Me – JoyDrop
Running Up That Hill – Placebo
Dare You To Move – Switchfoot
Dream On – Areosmith
I am the Man – Philosopher Kings
On a Day Like Today – Bryan Adams
Ordinary Day – Vanessa Carlton
Relax – Frankie Goes to Hollywood
Sweetest Perfection – Depeche Mode
The next step is putting it all together. This is where the coffee stops and the glass of wine begins. Editing video has put quite a strain on my computing resources and I have had some monumental crashes. Save and save often. If you lose your work.....blame the wine.
I have several programs to edit, but mainly stick to 3 because, well I am too lazy to learn the others that I have. Once you get use to a format, change is difficult. VirtualDub for clipping raw footage. Vegas to put it all together. And to make a small file I import the Vegas render into Window Movie Maker (the C Drive crash of 2004 solved the little reinstalling problem). When it doesn't crash on me, it puts the audio in quickly and makes a nice small file to load to my site. Probably an easier way to do it, but it works for me.
I don't know much, but heck if you're bored you can read the process of making a montage and how to perform the basics.
First get VirtualDub
Open the file you wish to clip
 Since you are probably not going to use the audio from the clips, it is easier to remove it now, instead of when you are putting the video together. Go to the menu bar and select Audio. Click No Audio. This setting will hold for every file you import, until you close the program down.
Next choose your compression. Files produced with the native settings of VirtualDub can be huge, even for a 2 second clip. Go to the menu bar and select Video and click compression. A pop up will appear. Select the compression you want. Some may not be available if you do not have the codecs. Experiment to see which suits you best.

Time to take a clip from the raw footage. Using to MARKER tool, select the beginning and the end of the clip you want.

Go to the menu bar and select FILE, save as segmented .avi
OPTIONS: You can change the size of your video and other basic filters available here.
 You have completed the clipping portion, now let's get down to business.
Open your editing program.
 One of the greatest advantages of getting another editor beside MovieMaker is the ability to layer. With layering you can create some really interesting effects. I really like to create a gaussian effect to the clips I use. This really helps if the clip isn't of the best quality because you can somewhat blend the image to make it a little smoother. Lessons the pixelation. Even if the clip is of really good quality, using this effect can add nice glow to your subject. For example. Take a clip and duplicate it. Stack them on each other on the storyboard.
 Change the Opacity level of the top clip by dragging the line on the top of the clip. Then apply effects to the bottom clip. This will allow you to maintain the image in a recognizable form, but have a few fx appear through the clip.
Both clips changed to black & white
This is the top clip at 65% opacity with the bottom layer coming through.
The program makes it easy to apply fx and transition. Simply navigate the tabs at the button of the program and drag and drop the feature into the clip.
 When it comes to transitions, I like to keep it simple. In my first video montage I think I used every transition available. Looking back on it, it feels jumbled. Using just one or two transition throughout reduces the jarring effect when changing scenes. Personally I am found of the fade transition or no effect at all.
After you have compiled all your clips, finished your FXs, transitions and added your choice of music it is time to complete the final render. Depending on the size of your video, a rendering attempt can take several hours. After you render, you will find all the mistakes that you've made. You will groan a little, bitch at your PC, curse yourself and then finally go back and make the changes and sit through another long ass render. This behaviour will repeat itself several times before you get it just right. Then, several months later you will again revisit the project and see what you could have done differently, because everytime you start a new project, you learn something new. I guess that is the beauty of it.
Check out the rest of my montages at Shades of Clay
Other montage makers
A Life Uncommon
Clack Unlimited scroll down to Montages
Aflack Productions
It's All About Love
The Ideal Idol Spotlight Montages
 When it comes to transitions, I like to keep it simple. In my first video montage I think I used every transition available. Looking back on it, it feels jumbled. Using just one or two transition throughout reduces the jarring effect when changing scenes. Personally I am found of the fade transition or no effect at all.
After you have compiled all your clips, finished your FXs, transitions and added your choice of music it is time to complete the final render. Depending on the size of your video, a rendering attempt can take several hours. After you render, you will find all the mistakes that you've made. You will groan a little, bitch at your PC, curse yourself and then finally go back and make the changes and sit through another long ass render. This behaviour will repeat itself several times before you get it just right. Then, several months later you will again revisit the project and see what you could have done differently, because everytime you start a new project, you learn something new. I guess that is the beauty of it.
This is the my latest montage, it is the same one in the screenshot above.
3 years ago I would have never been working in a field where I was required to design websites, create training materials and edit video. But I am now and it all began with "Take".
Check out the rest of my montages at Shades of Clay
Other montage makers
A Life Uncommon
Clack Unlimited scroll down to Montages
Aflack Productions
It's All About Love
The Ideal Idol Spotlight Montages
Technorati tags: Clay Aiken, VirtualDub, video editing, montage, Sony Vegas, Windows Movie Maker, American Idol
